Showing posts with label On The Workbench. Show all posts
Showing posts with label On The Workbench. Show all posts
Thursday, January 16, 2014
Tuesday, January 14, 2014
Finally, I received my 2 Evergreen .60 plasti card in. I drew out the shape I wanted and made sure it was long enough and duplicated each peace. So, the tail doesn't feel so thin. Then I used my band saw to cut it out. I then took the wide piece and cut it in half and did some sanding to get it even as possible. I then glue the two halves to the small tail section. The tail basically looks like a double wedge shape or object.

Now it's minor sanding and then adding green stuff or my favorite, GW's Liquid Green to smooth out the surface. I just need to do few things before gluing it to the rear of my Centauri Dreadnought.

Now it's minor sanding and then adding green stuff or my favorite, GW's Liquid Green to smooth out the surface. I just need to do few things before gluing it to the rear of my Centauri Dreadnought.
Monday, January 6, 2014
First Circle access: Classified
Race: Narn Regime
Project Drone
Statistics: Gun Drone
Manufacture: Bor'Goth System
Atmospheric
Short Range
2 Pairs of Particle Guns
4 Light Pulse Cannons
Reinforce Armor
Mission Profile: harassment, overwhelm
Statistics: Missile Drone
Manufacture: Bor'Goth System
Atmospheric
Short Range
Extreme Explosive Pay Load
4 Light Pulse Cannons
Reinforce Armor
Mission Profile: The drone is essentially a large missile. Home in on it's designated target ranging from small to large ships. Carries extreme pay load. It will either cripple or destroy the ship all together. For defense, it has 4 Light Pulse Cannons to fend off incoming fire.
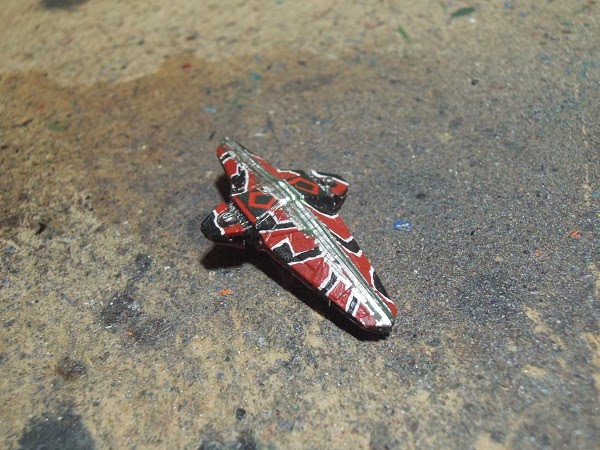
This was a very simple Kitbash I did this by using left over parts of a Varnic Long Range Destroyer. All I need to do now is to clean it and the paint it. I'm thinking of painting it similar to the Frazi Heavy Firghter or something along those lines.
Race: Narn Regime
Project Drone
Statistics: Gun Drone
Manufacture: Bor'Goth System
Atmospheric
Short Range
2 Pairs of Particle Guns
4 Light Pulse Cannons
Reinforce Armor
Mission Profile: harassment, overwhelm
Statistics: Missile Drone
Manufacture: Bor'Goth System
Atmospheric
Short Range
Extreme Explosive Pay Load
4 Light Pulse Cannons
Reinforce Armor
Mission Profile: The drone is essentially a large missile. Home in on it's designated target ranging from small to large ships. Carries extreme pay load. It will either cripple or destroy the ship all together. For defense, it has 4 Light Pulse Cannons to fend off incoming fire.
This was a very simple Kitbash I did this by using left over parts of a Varnic Long Range Destroyer. All I need to do now is to clean it and the paint it. I'm thinking of painting it similar to the Frazi Heavy Firghter or something along those lines.
Sunday, January 5, 2014
After debating and contemplating for the name of this Centauri Dreadnought. Finally, Behold the
Optaurium Class Dreadnought
another quick update


It turns out there was a lot more to do then I thought. I had to correct some areas. I then extended the wing span and now it really has the overall bat appearance. I then added 4 Battle Lasers and then the 36 Twin Arrays. Now it just minor clean up and that is it. Still waiting for my Evergreen .60 Plasti Card to come in.
Tuesday, December 31, 2013
update on Centauri Dreadnought


I have just finished filling in the large gapes and smoothing some areas of the main hull. Used GW's Liquid Green and then super glue to get a smooth finished. Now, I'm in the process of filling minor stuff through out the ships hull by applying what I did before. Despite that I want to finish my Dreadnought quick. The best approach will be taking my time so the Dreadnought will look great when finished. I haven't worked on the tail yet because I need to get more Evergreen Plasti Card, the size I'm after is .60. That size is thick enough and will work well for the tail. As how long the tail I want it to be, I'm not sure.


I have just finished filling in the large gapes and smoothing some areas of the main hull. Used GW's Liquid Green and then super glue to get a smooth finished. Now, I'm in the process of filling minor stuff through out the ships hull by applying what I did before. Despite that I want to finish my Dreadnought quick. The best approach will be taking my time so the Dreadnought will look great when finished. I haven't worked on the tail yet because I need to get more Evergreen Plasti Card, the size I'm after is .60. That size is thick enough and will work well for the tail. As how long the tail I want it to be, I'm not sure.
Wednesday, December 25, 2013
Centauri Dreadnaught Kitbash


This is going to be the last kitbash for the Centauri which is a Dreadnought. The idea behind it was simple at first. When I saw the movie Star Trek Nemesis, What caught my attention was the Reman Warbird Scimitar. I thought too my self, what if I can apply that look for a Centauri Warship. After contemplating for a long time. I decided to use two Mongoose Centauri Adira Royal Battleships and one Primus Battlecruiser. The approach for the warship will be quite different compared to other Centauri Warship. For instance the crescent shape was used heavily through all of Centauri ships. I decided to give the Dreadnought a bit of a bat appearance while retaining some of the traditional crescent design that the Centauri love. The reason for a Dreadnought was this, The Centauri did not really need another battleship. They where fine with the Octurion Class they already have.
I still have a lot of sanding and green stuff to add. I will then add a few extra Centauri bits here and there. Then I will add a tail at the end of the Dreadnought to give it more of a centauri feel to finish off the design.
There will be no fighters, This is simply a big gun in space. That is because, I have a Super Assault Carrier already my Centauri Fleet.
Primary & Secondary Main Weapons: Two Optional layouts
4 Improved Neutron Cannons
4 Matter Cannons
or
8 Matter Cannons
+
4 Advance Battle Lasers
Two Optional Weapon main Layouts: Depending on the tactical and mission profile.
Defensive Weapons
36 Twin Arrays
Twin Arrays: The reason for the down grade of the Twins Arrays is because of the amount of energy require to use for the 4 Improved Neutron Cannons. The Twin Arrays are just as effective compare to the Heavy Array, just less advance.
Primary and Secondary Hull Plating
Improved Armor
Advance Communications
Improved Sensor Suite
Primary and Secondary Reactors
Advance Thrusts
Shuttle Compliment: 8
Reactors: The reason to have two reactors is this, the first reactor will require to channel the amount of thrust to propel the ship and to power up the other systems on board. The second reactor requires to power up the weapons.
I was going to add a mass driver by using one from a Dilgar miniature I had in my stash by adding to the under belly of the Dreadnought. Then I felt that was a bit overkill.
Monday, September 16, 2013
Thursday, September 12, 2013
Here I have been adding some detail. Such as antennas in 10 different locations. I'm not quite done since I will have to add some GW's Liquid Green to give a structure to the main Communication arrays. That will take time and some imagination. Next up, I finally got the clamps on my main hanger and the large Clamp/Elevator tube on as well. These clamps, I'm not so sure if I should add some detail to them. Since they are going to hidden any ways underneath the ship. I will be pondering for some time if I should leave those clamps as is.


Wednesday, September 11, 2013
Here I have attached the left and right hangers onto my Super Assault Carrier. I then went in and filled all the major gaps with GW's Liquid Green Stuff. Now I'm waiting for the green to dry and do some cleaning. I will show you here two images of the top and bottom of the super assault carrier looks like.


The main hanger is going to be tough trying place it in the middle of the ship without looking like crap.


The main hanger is going to be tough trying place it in the middle of the ship without looking like crap.
Tuesday, September 10, 2013
As you can see here, I added a nice layer of GW's Liquid Green stuff on both sides of the 3 Hangers. Once those where dried, I sand it down and now I have a smooth finish. You can see this on the image that sanding was used and left some of the Liquid Stuff on it. In the mean time, I'm doing more modifications and more sanding.
The Hangers are going to be unique for this Centauri Super Assault Carrier. The two small ones are permanent on the left and right side of the ship. The main long hanger is what makes it unique and will be in the middle of the ship and below the main structure of the ship that also in the middle. The main hanger will be detachable and re attached depending on the mission profile. The main hanger will have tubular clamps that I will be adding later. There will be a elevator/clamp tubing I'm adding, between the main hanger and the main structure. This elevator/clamp will allow the pilots to get to their fighters with out having to sit in them for such long periods of time while in hyperspace or travelling between star systems.

This has to be the most challenging Kitbash so far I've ever done.
Here is another update, I finally received my Centauri Balvarian's and I'm using the hangers to add them to my Supper Assault Carrier. What I am doing is adding superglue and baking soda on the sides of the hangers to get a smooth side. That is the beauty of those two ingredients. When combine, it hardens into like plastic. After that, it's sanding the sides and adding a layer of GW's Liquid Green.
I still have a lot of sanding to do and some small modifications to do.

I still have a lot of sanding to do and some small modifications to do.


Subscribe to:
Posts (Atom)